Managing Users
Users encompass all the members of your project and their permissions. Administrators can view all users via the list view in Project Console's Control panel. However, Administrators can only directly manage native users![]() Native users are created and deactivated within Smart Flows via the Project Console. within the Smart Flows Project Console. To manage Connected users
Native users are created and deactivated within Smart Flows via the Project Console. within the Smart Flows Project Console. To manage Connected users![]() Connected users already exist in your CRM system and when the CRM is connected to Smart Flows, the user list is connected as well. This connection allows you to use the same users from CRM in Smart Flows and set their user role in your CRM system, you'll need admin privileges in your connector system.
Connected users already exist in your CRM system and when the CRM is connected to Smart Flows, the user list is connected as well. This connection allows you to use the same users from CRM in Smart Flows and set their user role in your CRM system, you'll need admin privileges in your connector system.
Native users
This section covers the management of native users within Smart Flows. Native users are those that are directly created and managed within Project Console instead of connected users from your connectors. In this section, you will learn how to create, activate, and deactivate native users.
Creating Native users
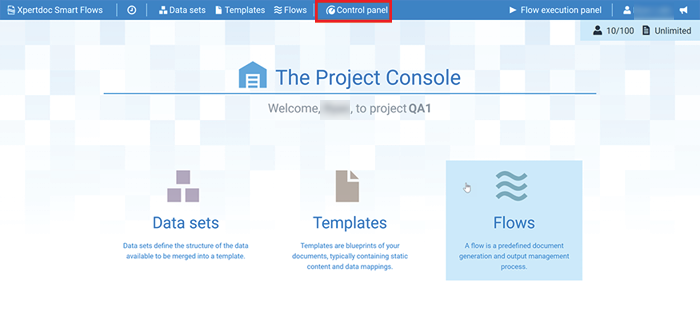
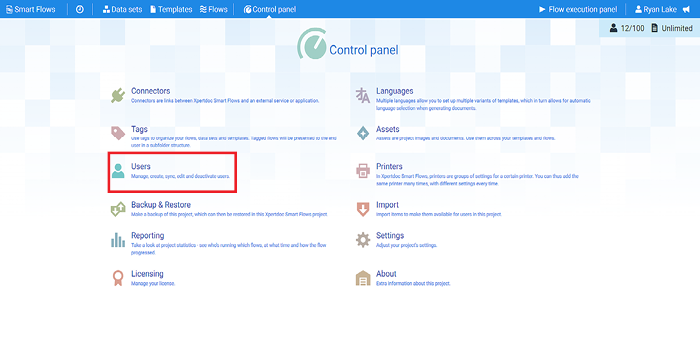
| 1. | In Project Console, select the Control panel button. |
The Control panel displays.
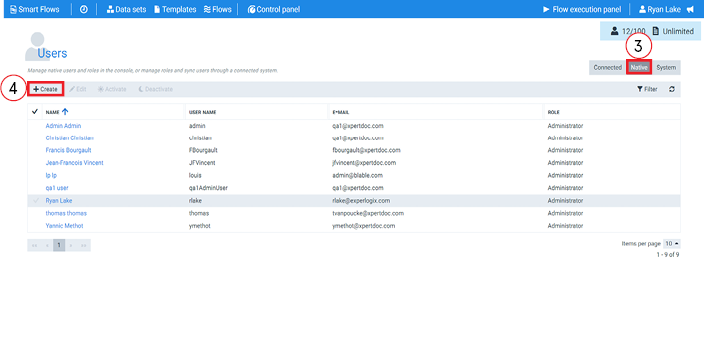
| 3. | Select the + Create button. |
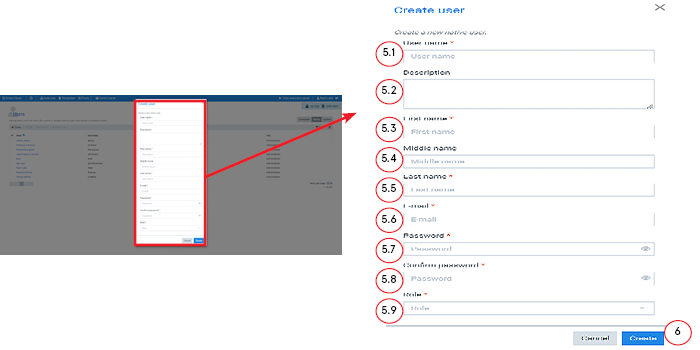
The Create user dialog displays.
| 4. | Create the user. |
| 4.1. | In the User name field, input the name to display for the user. |
| 4.2. | In the Description field, input any descriptions you need for the user. |
| 4.3. | In the First name field, input the user's first name. |
| 4.4. | In the Middle name field, input the user's middle name. |
| 4.5. | In the Last name field, input the user's last name. |
| 4.6. | In the E-mail field, input the e-mail the user will utilize for logging into Smart Flows. |
| 4.7. | In the Password field, input a password for the user. |
| 4.8. | In the Confirm password field, input the same password entered in the Password field. |
| 4.9. | In the Role field, select the User Role to define the new user's permissions in your project. |
|
Role |
Function |
|---|---|
|
Administrator |
Administrators have access to all components of Smart Flows with no restrictions. They are also able to assign and manage the roles of other users. |
|
Designer |
Designers have a reduced number of Project Console abilities with a focused set of permissions related to creating managing templates and flows with permissions for managing yourProject Consolesettings. They can access the Template Builder add-in for designing templates. |
|
Super User |
Super Users are like users but can run other users' flows. Most Super Users are assigned this role when using the API, but it can only be assigned to native users. |
|
User |
Users can accessFlow Execution Panel and run flows. |
|
Xpertdoc Smart Flows Workflow Executor |
Group role that allows non-Smart Flows users to execute Microsoft Dynamics 365 CE Workflows. These users are not synced in Smart Flows. The Xpertdoc Smart Flows Workflow Executor user role only exists in Microsoft Dynamics 365 CE. |
| 5. | Select the Create button. |
The new user displays in the List view.
Activating and deactivating native users
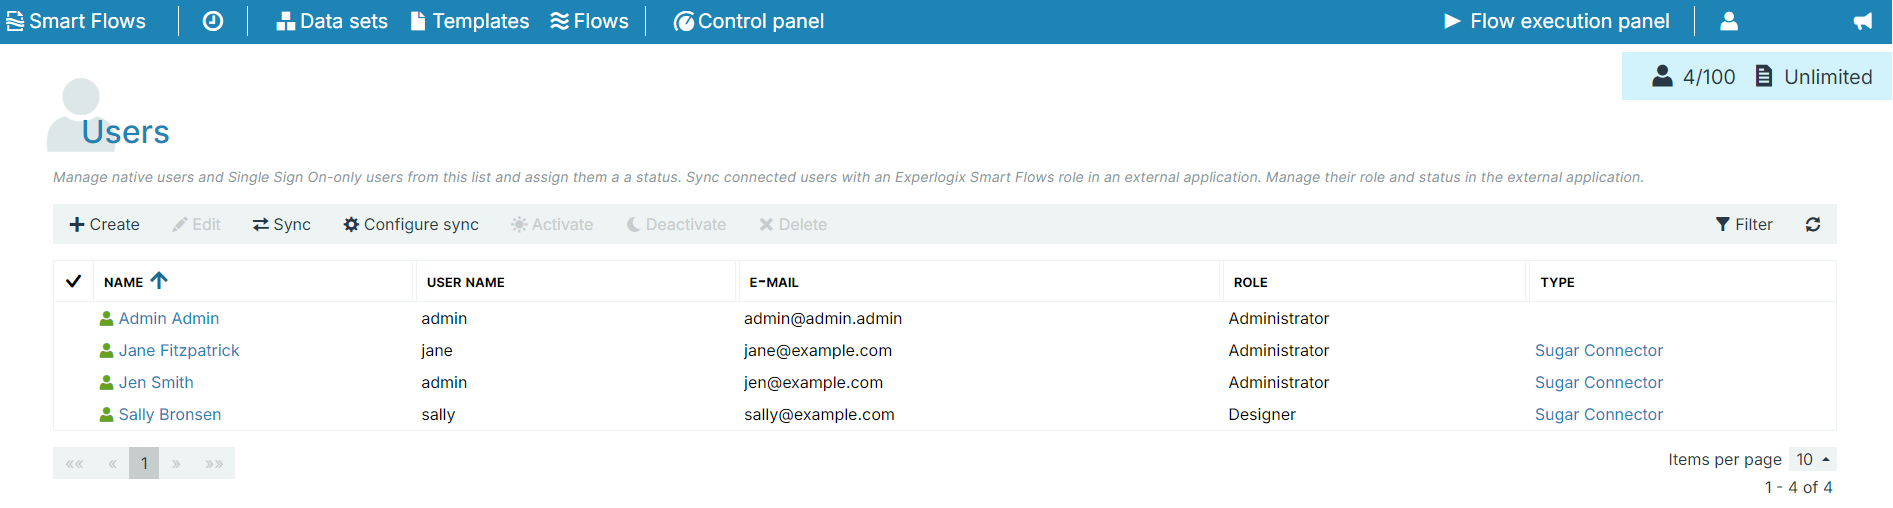
Administrators can activate and deactivate native users from the native users' List view in Project Console's Users List view. Activating a user confirms their creation within Smart Flow while deactivating a user renders them unable to log in or interact with Smart Flows. All items created by a deactivated user remain intact after deactivation.
It is not possible to deactivate the final remaining native administrator.
| 1. | In Project Console, select the Control panel button. |
The Control panel displays.
| 2. | Select the Users button. |
The Users page displays.
| 3. | Select the Native button. |
The page refreshes with any existing native users.

| 4. | Select the users to deactivate or deactivate |
| 5. | Select Activate or Deactivate as required. |
Connected Users
This section covers syncing connected users from connectors to Smart Flows. Connected users are not native to the platform and require synchronization from their connector system to ensure they have the correct roles and permissions within Smart Flows.
Syncing Connected Users
Syncing connects the existing users in your connected system to Smart Flows. This allows you to manage your users directly through your existing CRM. However, you'll first need to assign them the correct security roles from within connectors. Connectors supporting automatic user creation at log in automatically receive a Smart Flows user id when they log into Smart Flows via the Login page
When syncing users with multiple connectors, such as Microsoft Dynamics 365 F&O and Microsoft Dynamics 365 CE, the system is configured to sync both connections at the same time. However, when unassigning user roles the user must be removed from all host systems.
Enabling Automatic User Sync in the Settings
Connectors supporting automatic user creation at login
If you are a first-time user with a Smart Flows security role within the connector system, your user account will automatically be created and you will be logged into Smart Flows.
The following connectors support users automatic user creation at login:
-
Microsoft Dynamics 365 F&O
-
Microsoft Dynamics 365 CE
-
Module for Sugar
-
Salesforce
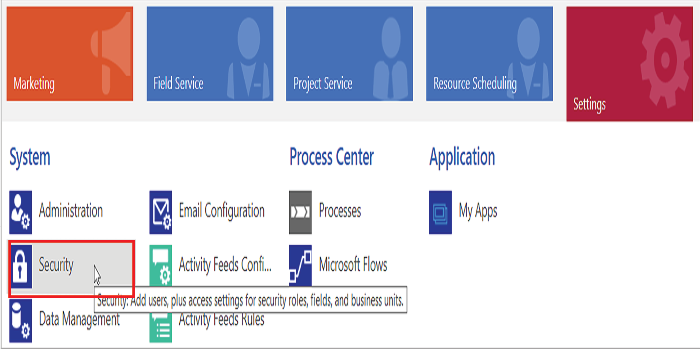
| 1. | In Project Console Control Panel, select the Settings button. |
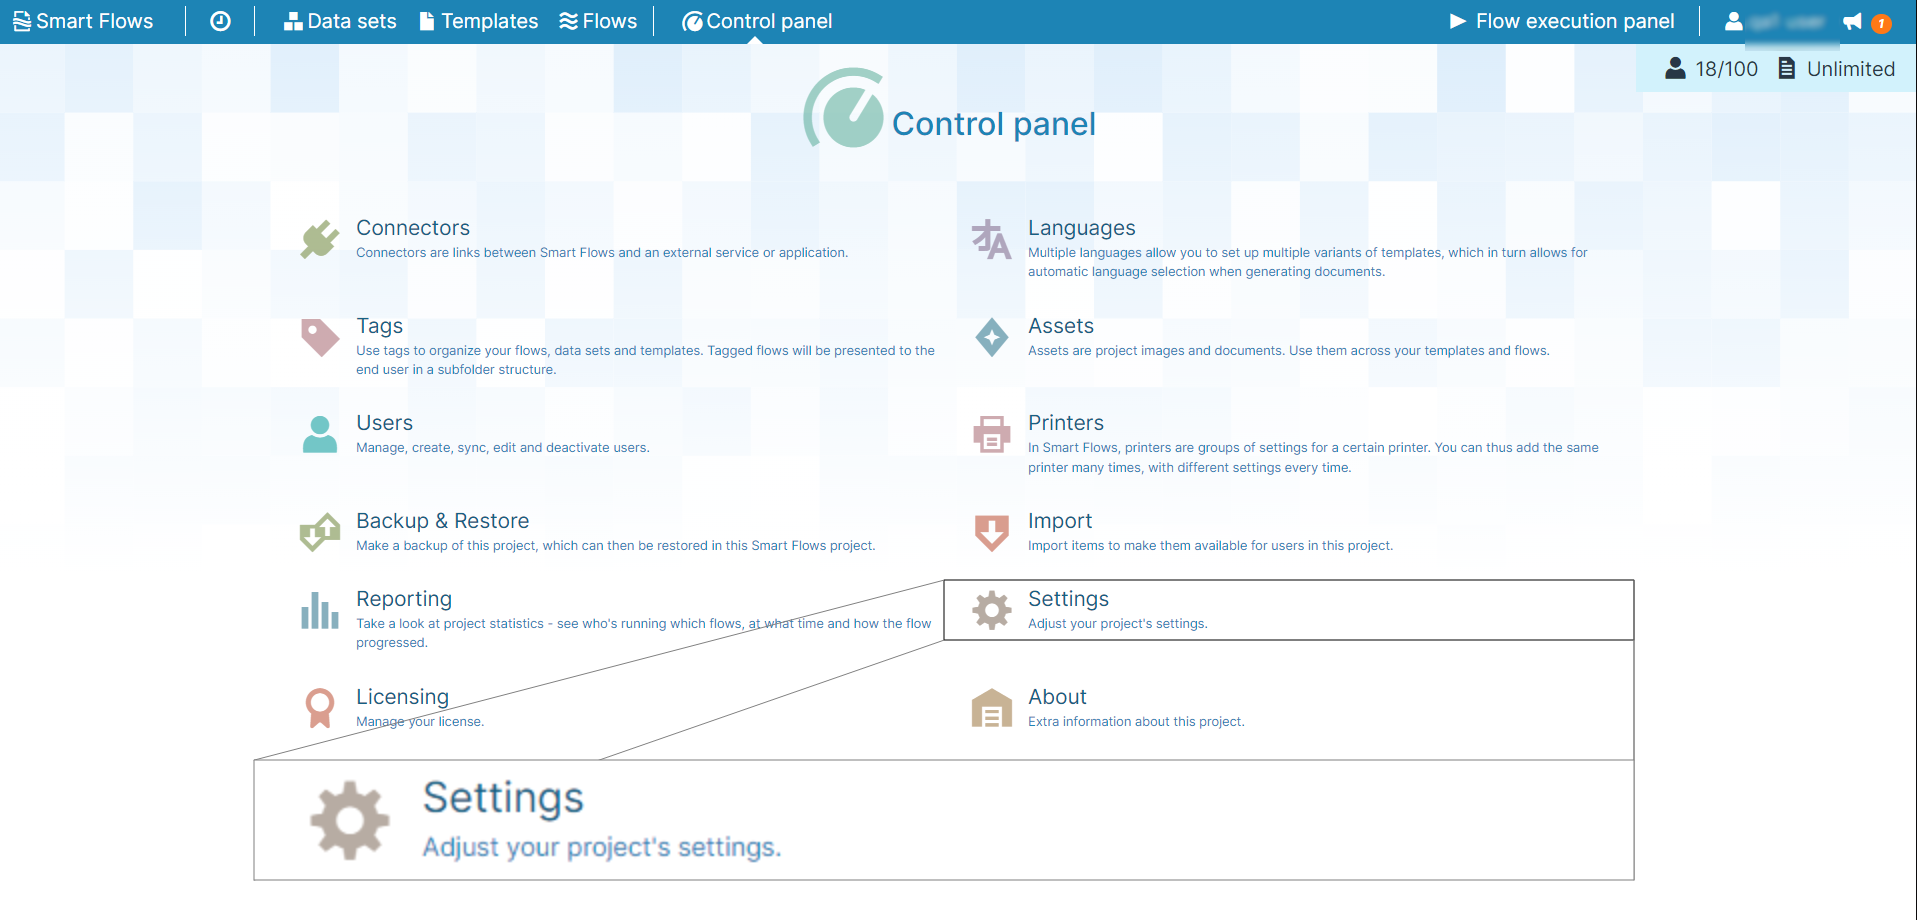
| 2. | In the left-hand navigation, select User management. |
The User management view displays.
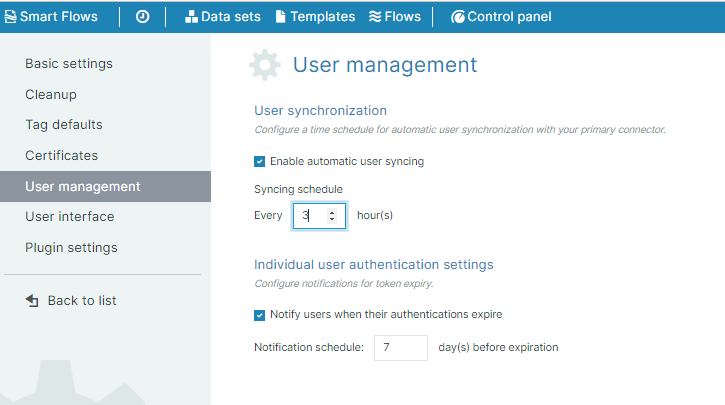
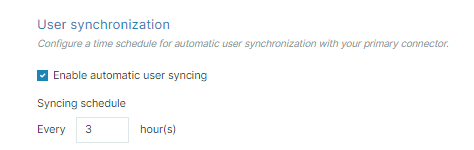
| 3. | Select the Enable automatic user syncing checkbox. |
| 4. | Set the Syncing schedule time using per hour(s). |
| 5. | Select the checkbox Notify users when their authentications expire. |
| 6. | Set the Notification schedule for n number of days. |

Setting User Roles with Security Groups
Admin users in the connected system can create and assign users to the user groups outlined in the table below. With the updated user sync for Smart Flows, users assigned to the group are automatically created in Smart Flows when they attempt to log in via the Login page. You can also set user roles within Smart flows via the teams function within Microsoft Dynamics 365 CE.
For the following connectors if you have "Manage the synchronization of users when they log in" enabled, the system automatically checks your users security role and updates the security role in Smart Flows if their is a mismatch. Administrators can manage this via Settings User management in Project Console. Manage the synchronization of users when they log in" is enabled by default for all new projects created after Smart Flows Version 4.23.0.
The following connectors support users automatic user creation at login:
-
Microsoft Dynamics 365 F&O
-
Microsoft Dynamics 365 CE
-
Module for Sugar
-
Salesforce
The process below demonstrates how to set user roles for security groups within the Dynamics 365 CE environment. Users assigned to the security group will automatically receive the corresponding roles within Dynamics 365 CE, see Setting security role from within Dynamics process. We outline the steps below to modify an existing team to add the Smart Flows security roles; for more information on overall Microsoft Dynamics 365 CE team management, refer to Microsoft Dataverse teams management.
| 1. | Create new teams for each of your Smart Flows Security Roles. Refer to create a new team for more information. |
| 3. | Select the Teamsbutton. |

| 4. | Select the small arrow next to your team's title |
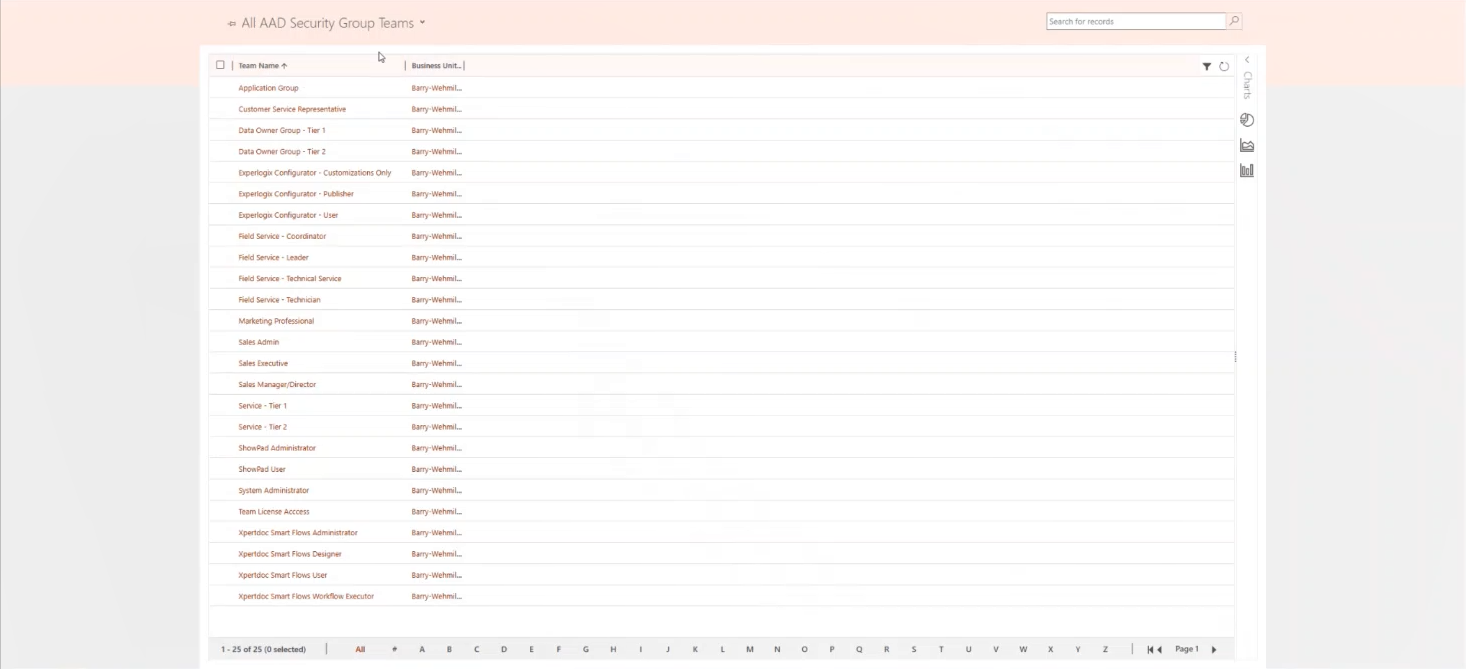
| 5. | In the dropdown menu, select all ADO Security Group Teams. |
The page refreshes with all of your organization's Security Group Teams.

| 6. | Select the Security Group you wish to modify. |
The Security group page loads
| 7. | Retrieve the Microsoft Entra ID Object ID for the security role you wish the group to have. Refer to Find subscriptions and roles for more information. |
|
Role |
Function |
|---|---|
|
Administrator |
Administrators have access to all components of Smart Flows with no restrictions. They are also able to assign and manage the roles of other users. |
|
Designer |
Designers have a reduced number of Project Console abilities with a focused set of permissions related to creating managing templates and flows with permissions for managing yourProject Consolesettings. They can access the Template Builder add-in for designing templates. |
|
Super User |
Super Users are like users but can run other users' flows. Most Super Users are assigned this role when using the API, but it can only be assigned to native users. |
|
User |
Users can accessFlow Execution Panel and run flows. |
|
Xpertdoc Smart Flows Workflow Executor |
Group role that allows non-Smart Flows users to execute Microsoft Dynamics 365 CE Workflows. These users are not synced in Smart Flows. The Xpertdoc Smart Flows Workflow Executor user role only exists in Microsoft Dynamics 365 CE. |
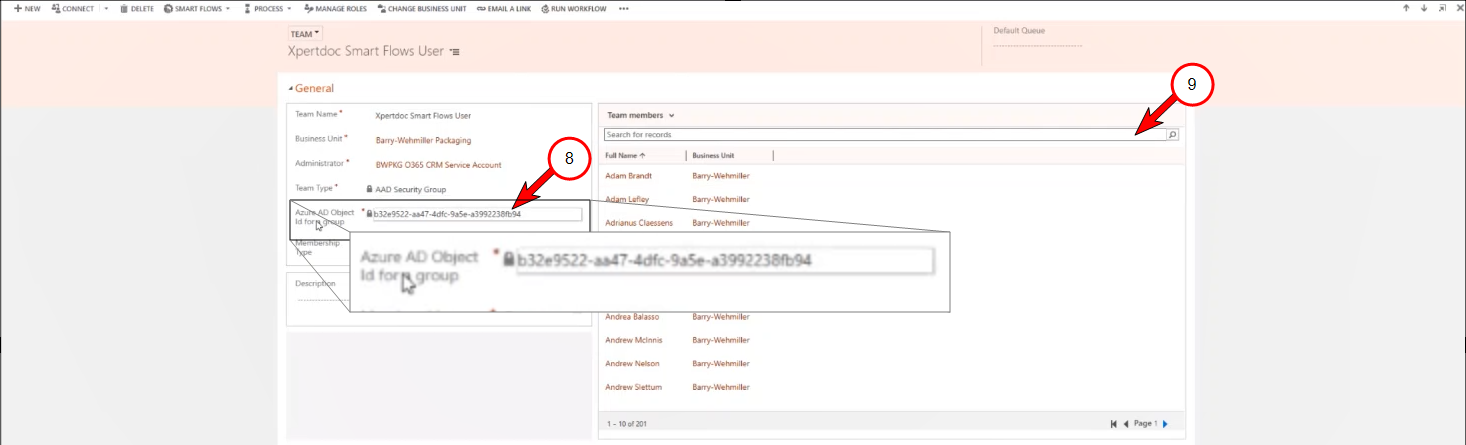
| 8. | In the Microsoft Entra ID Object ID for a group field, copy and paste the Subscription ID. |
| 9. | Use the search bar to assign users to the Security Group. Refer to Manage team members for more information. |
| 10. | Repeat Step 2. through Step 9. for any remaining groups. |
Manual user sync
When syncing users with multiple connectors, such as Microsoft Dynamics 365 F&O and Microsoft Dynamics 365 CE, the system is configured to sync both connections at the same time. However, when unassigning user roles the user must be removed from all host systems.
| 1. | In Project Console, select the Control panel button. |
The Control panel displays.
| 2. | Select the Users button. |
The Users page displays.
| 3. | In Project Console Users List view, select the Sync button. |
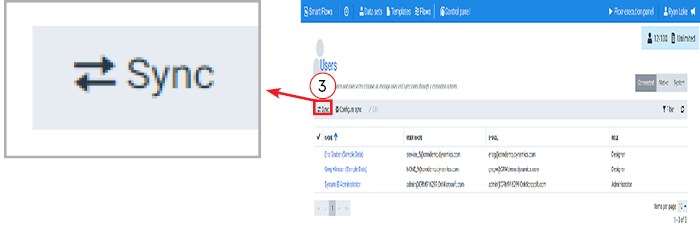
A message displays informing you that Smart Flows is syncing users in the background.
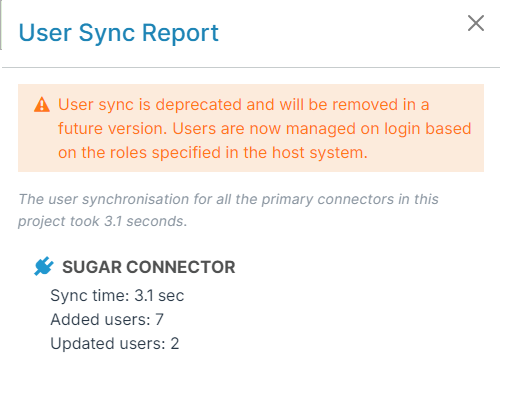
When the synchronization process completes, you'll receive a user sync report.
Automatic user sync
You can access the Enable automatic user syncing setting from Control Panel > Settings > User Management tab. See Settings for more information.
| 1. | In Project Console, select the Control panel button. |
The Control panel displays.
| 2. | Select the Users button. |
The Users page displays.
| 3. | Select Regular. |
The List view refreshes with the list of currently synced Connected users.
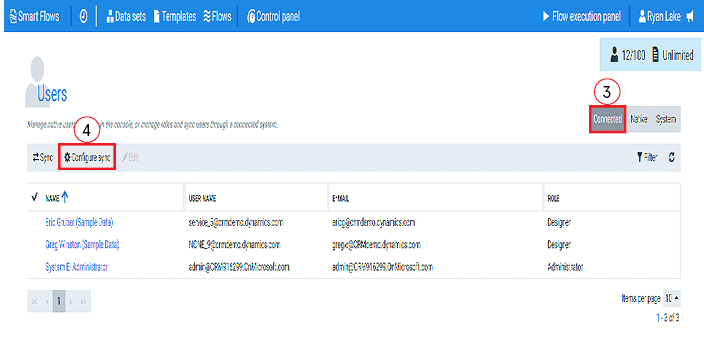
| 4. | Select the Configure sync button. |
The Configure sync dialog displays.
| 5. | Select the checkbox to Enable automatic user syncing. |
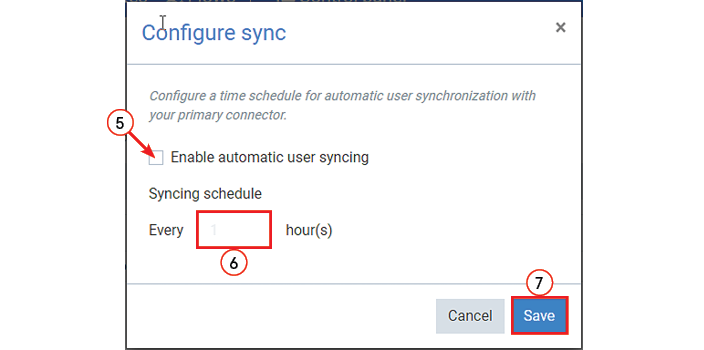
| 6. | In the Syncing schedule field, input how often the user sync process occurs. |
The schedule is calculated starting from midnight. For instance, if you select "Every 3 hours" in the schedule, the sync occurs at 0:00, 3:00, 6:00, 9:00, 12:00.
| 7. | Select the Save button. |
Create Connector User on First Log-In
If you have assigned your users a Smart Flows Role in your connected system, they can sign in with their connector from the Smart Flows log in for your instance and their user profile will automatically be synced from your connector to Smart Flows when they log in for the first time. You must ensure you have "On login with an existing user, update roles based on the Smart Flows role in the host system" toggled on in the Settings for this functionality to work. See Settings for more information.
Not all roles can access all components of Smart Flows. For example, if you are assigned a User role in Smart Flows, you won't be able to log into Project Console. If you attempt to use the sync user at log in functionality to access a component Smart Flows that isn't allowed by your role, you'll receive an error message. For more information on specific user roles, see Setting User Roles with Security Groups.
Managing Entra ID User Permission
During the authentication of the Smart Flows Dynamics connector, Microsoft Azure will ask the IT administrator to configure the user consent settings for the app. Smart Flows will not function for non-admin users when creating a Dynamics connector if the system configuration does not allow user consent for applications.
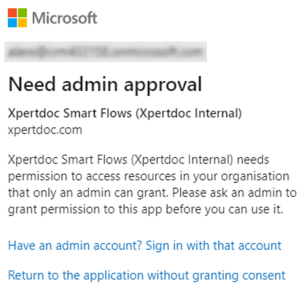
This permissions consent is completely separate from the security roles assigned in Dynamics. IT Admins have several configuration options available to meet their organizational security requirements. Our recommendation is to allow users for apps from verified publishers or to Assigning Smart Flows Consent to an Azure Groups.
|
Index No. |
Field name |
Description |
|---|---|---|
|
1 |
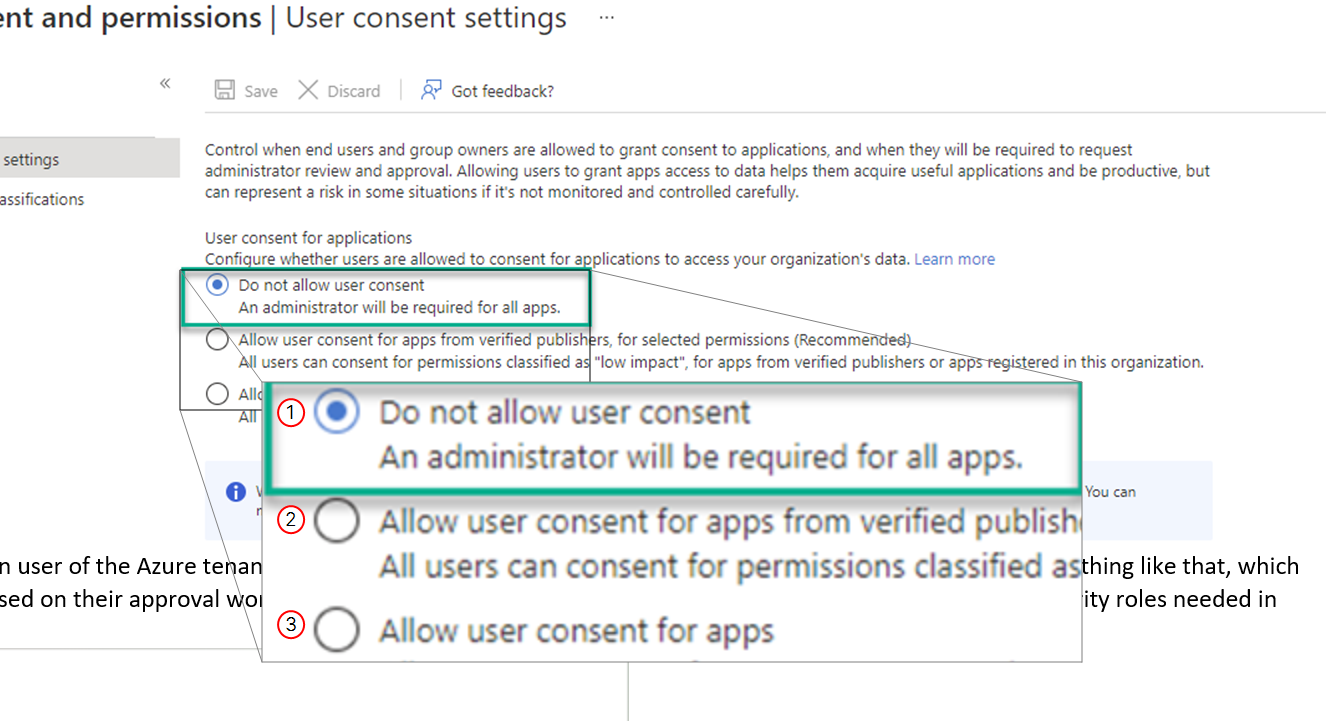
Do not allow user consent |
Prevents users from consenting to allow the Smart Flows application to make connections. |
|
2 |
Allows users to consent to apps based on the permissions configuration on your organization has created. |
|
|
3 |
Allow user consent for apps |
Allows all Smart Flows users to consent to for approval when connecting Smart Flows connectors. |
Assign Smart Flows Consent to an Azure Group
Assigning consent permissions to a group allows organizations to tightly control what apps are able to access their CRM data and who is able provide that consent.
| 1. | In Microsoft Azure, navigate to Home/Enterprise applications/Xperdoc Smart Flows. |
| 2. | Set Assignment required to Yes. |

| 3. | Create a group for Smart Flows users. |
| 4. | Search for and select the created group. |
| 5. | Assign that group the permissions to consent for the Experlogix Smart Flows application. |

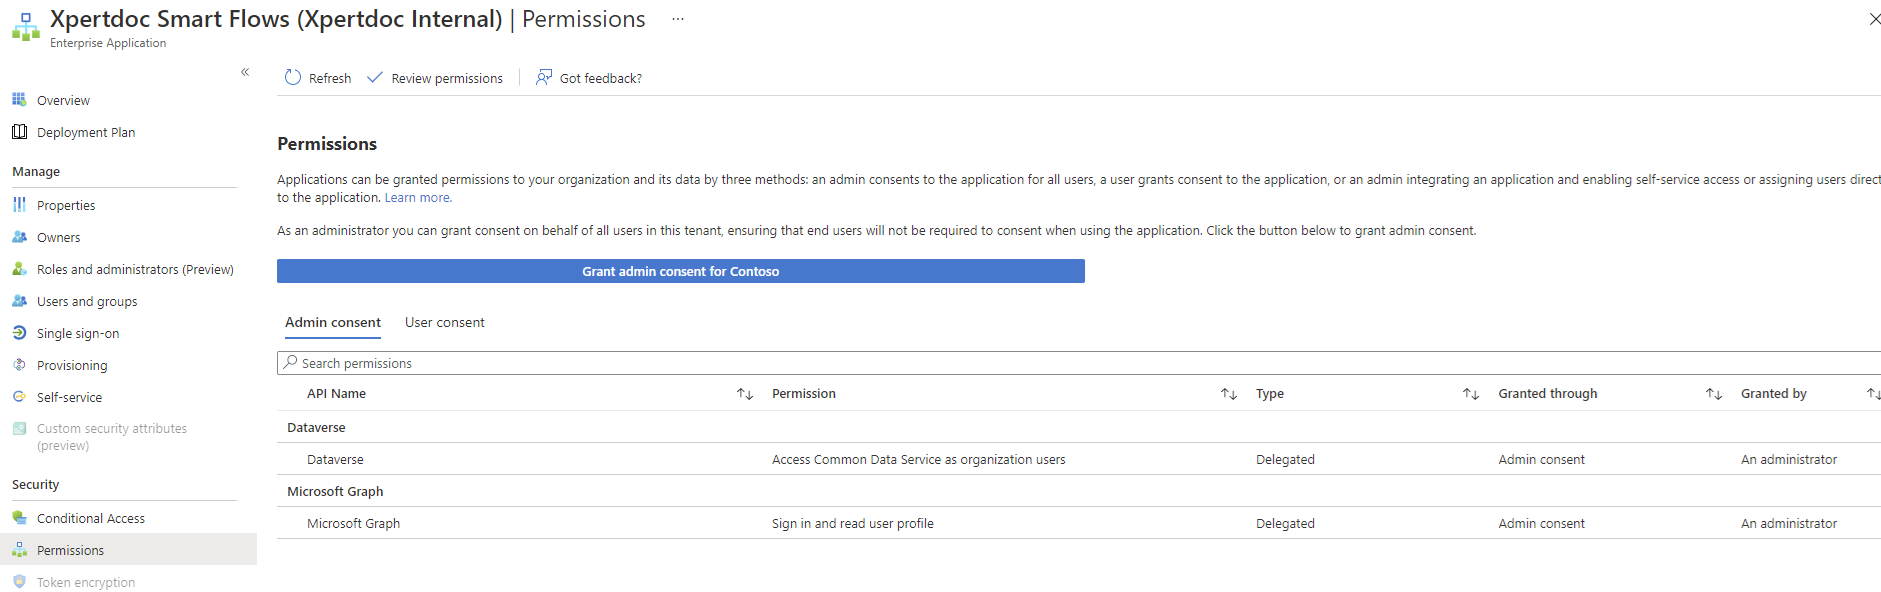
Approving Consent Requests
Microsoft Azure Administrators receive consent requests under the Admin Consent Requests tab.

Once approved, it will then add the Admin Consent under the Enterprise application created for Smart Flows.